
Pi and Owner together with a free T-shirt...got to love a free T-shirt!
So small, and yet so full of potential. Certainly doesn't come with any instruction manual but there's plenty of opinion floating about online (and in forums a lot less scary than Mumsnet). This is my baby. And I'm already so so proud.
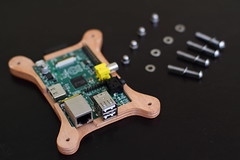
The Raspberry Pi, to those of you not in the know, is a tiny piece of British computing. It comes in at £25 for this, the top spec Model B. For your hard earned Pony, you get a 700mhz processor, 256mb of RAM, two USB ports and an Ethernet port. It uses HDMI for digital video output and is powered by a 5v Micro USB mobile phone charger. The OS and any programmes/files you create are stored on a single SD card.
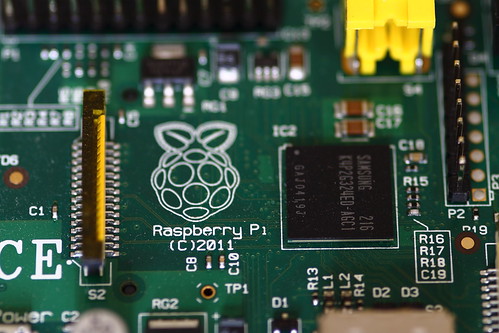
The Raspberry Pi Board
Of course, it's not all about kids. Already I've seen a dozen projects of great originality and fun. A low powered machine running Linux can do *so* much it's mind-blowing. My own dreams are much less grand.
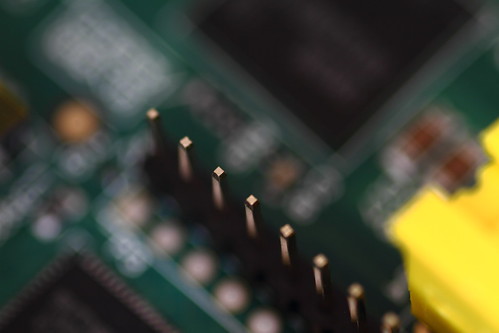
The Pi comes with plenty of pins so that clever people can take over the world
First and foremost I wanted to have a computer I could really play with. It's all well and good experimenting with your every day computer, but the fact is that if you do something wrong you risk not having access to email, losing important files etc. This way, if the very worst happens, I can just wipe the SD card and start again from fresh. Also, being a Linux OS (currently Debian Squeeze) I get to have the fun of playing with the command line. I like the command line. It feels polite. Most of the time we prod at buttons, lacking the courtesy to ask nicely for what we want. Command line is please and thank you. And what's more, you're able to do pretty much everything from one place rather than having to trawl through the desktop menus to find the one thing you want.
I'm tweeting from my pi which is now sitting in it's nearly complete case.It's looking fab
— Stephen (@themanoutside) June 5, 2012
One of the first things I learnt to do was to tweet from the command line using Twidge
Secondly I liked the idea of simple, low power consumption computing for things like word processing. I've installed Abi Word and, with my Filco keyboard hooked up, I can't think of a more appropriate word processing machine. Forget wifi internet access - unless I go to the trouble of plugging in the ethernet cable, I'm without the net. And anyway, if I start trying to do both at the same time, things will slow down. So it makes sense to be disciplined and single minded in your writing.
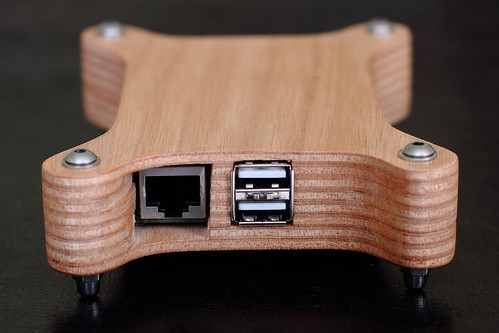
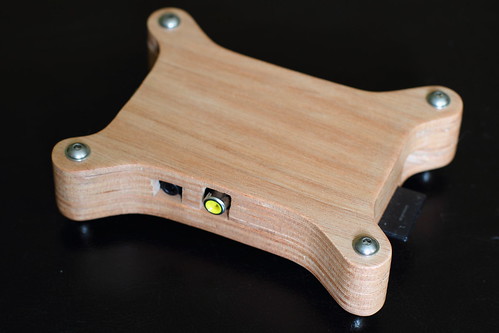
Looking straight on at the Ethernet port (which was heavily recessed) and the USB ports
Thirdly, I've been wanting to scratch build a computer enclosure for a very long time. I'd dreamt of doing something with mini-itx as I didn't care about great power and wanted the finished item to be small. Small? Mini-itx is massive in comparison to this thing! Just take a look of it in comparison to my HTC Desire.
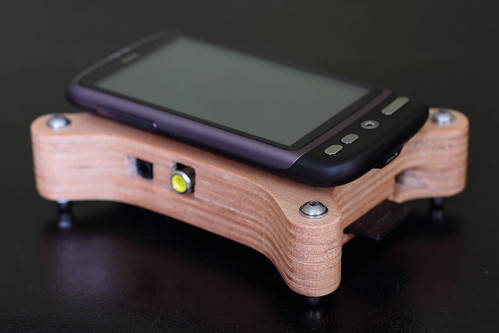
Size comparison between finished PlyPi and HTC Desire Smartphone
So here we have it - 3mm plywood layers cut carefully on my rusting, aged scroll saw. Honestly, it shook so much I expected it to fall apart. I will hopefully upgrade the machine at some point which would make the whole thing easier (poor cutting depth meant I could only cut one layer at a time). The eight layers were split 3/5 and glued to form the top and bottom. I 'temporarily' glued the two layers together with Tesco own brand pritt stick, only to find afterwards that it was the strongest glue in the world! With the case in one block I was able to sand it down to even up my poor cutting and, after drilling the four bolt holes, finish to 400grit. It was then (eventually) split into the two halves and coated with sanding sealer and wax to keep it looking as natural as possible. In the original design I'd been thinking about a flower press and had intended to use wing nuts on top. However when I fitted some temporary (too short at 25mm) machine screws, I was rather taken with the look. So the case was finished with 30mm M4 stainless button head bolts with stainless washers and dome head bolts (which then acted as feet). It's easy to undo the dome heads with your fingers and then gain access to the Pi.
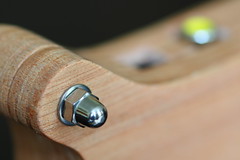
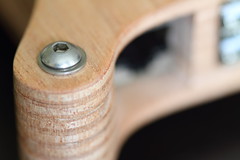
Close-ups of nuts and bolts and an image showing the split PlyPi and fixings
I had thought about leaving a hole to view the LEDs, but as my initial use will be less experimental (globally speaking - it's pretty experimental to me!) I don't see this as a great problem.
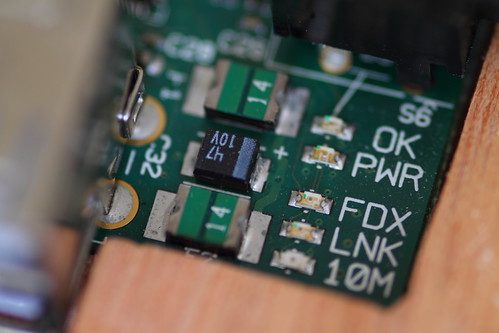
Close-up of the LEDs which have been left covered - design flaw? Or sacrifice to aesthetic perfection?
As it is, I like the simplicity. Frankly I think it's prettier than anything Apple could do.
Isn't it lovely?
So there you have it. I've already learnt all manner of exciting things and there's so much more to come!
EDIT 2013 - PLANS NOW AVAILABLE
William Morris said, "If you want a golden rule that will fit everything, this is it: Have nothing in your houses that you do not know to be useful or believe to be beautiful."
ReplyDeleteThis is both and so are you.
I really loved reading your blog. It was very well authored and easy to undertand. Unlike additional blogs I have read which are really not tht good. I also found your posts very interesting. In fact after reading, I had to go show it to my friend and he ejoyed it as well! wooden wedding usb
DeleteExcellent case. Simple and very effective.
ReplyDeleteWill you be making these cases available for sale?
ReplyDeleteGreat ! Thanks for the idea, I will try to do the same for my Pi next weekend. I was going first to some ready plastic box, but as I have been earlier building loudspeakers etx...I wonder why I did not come up with the idea of wood.
ReplyDeletePerhaps I was thinking too complicated carving...but idea of using plywood layers makes it easier with basic tool available in home.
Big thanks, and great job you have done !
@Barrett - I will hopefully be making a few for sale, but that'll be in a month or so. What's more, they won't be mass produced, so they won't be ever so cheap.
ReplyDelete@Marko - That's great! It took me a few days thinking before I gave up on the idea of routing out solid wood to fit the pi. The ply took some careful measuring, but was much more straight forward. With a decent fretsaw it'd have taken half the time too.
Hope you get on really well making your own - if you are able, I'd love to see a photo of it when you're finished.
@Stephen - Have you think about cooling? Or have you noticed any problems with that, I guess Pi run pretty cool, but still fully closed box might get at least warm over time.
ReplyDeleteI have think about it, but will probably add it later if needed.
I have been little wondering also how to make GPIO connector accessible, I would not want to make a hole on top, so will probably look some L-connector that could bring it to side.
What kind of wood was the cover on your plywood, I managed to find on some hobby shop only one with birch, but yours look little more darker wood than birch?
@Marko - I recently ran a slideshow of 100+ images repeated over 7 hours or so. It got warm, but not as warm as a smartphone gets, so I imagine it'll be fine with the enclosed case. That said, for those people wanting numerous Pis crunching data for days on end, I imagine some sort of cooling might help.
ReplyDeleteHave you seen the breakout boards people have made? Something like that might be a good idea for you.
Honestly, I'm not sure of the facing wood of the ply. I bought it from a local model making shop. That said, birch ply is nice and strong. If you wanted it darker, you could always stain it after you've finished making the case.
@Stephen - OK, good to know, then I dont worry to make extra holes in box.
ReplyDeleteMaking layers from plywood is pretty slow, I am already now planning a new version that could be build from 2 layers, plan is to use some solid wood board, plus top/bottom separately.
I am also going more on basic "box/square" shape to make it easier and faster to build. I will build a second prototype after I get this plywood finished.
Not so easy...trying to do the middle 6 layers from only two parts, seems to end up to demand of CNC machine.
ReplyDeleteSo using plywood, or any other similar thin material and doing thing layer by layer seems to be the only solution.
I am carefully thinking now the easiest order of cutting, and gluing, writing down order of things to do etc...tricky.
@Marko - I came to a similar solution. I do intend to make a case from a single piece of solid oak in the future, but the design will be radically different, not to mention significantly larger.
ReplyDeleteYou know, I reckon if I'd even gone for the 4mm ply I'd have had more problems. The layers need to be that small to allow you to fit things like the SD card.
I am thinking to mix 3mm and 4mm plywood....but not sure yet, trying little bit different scenarios on paper...also came my mind to make one layer from plastic or something clear material, and put some light inside to have one layer "glowing".
ReplyDeleteI am looking a lot small carving machines like, Proxxon MF70 or similar, would have some other use also time to time.
But I will defenetly do another one still from plywood also with different shape.
Also found this funny "paper box":
http://squareitround.co.uk/Resources/Punnet_net_Mk1.pdf
(http://www.raspberrypi.org/archives/1310)
Case for Raspberry Pi seems to be interesting and growing subject in internet recently :)
I did think about thin perspex layers at one point. I'd wondered if it'd be possible to have individual perspex layers lit by the LEDs on the Pi itself using fiberoptics. I think I came to the conclusion that it'd probably not work and be a lot of messing about. One single layer lit might look rather nice, though. Especially if you set it up with the GPIO - you could then program it to blink in interesting ways!
ReplyDeleteNow, a milled wooden case would be very nice, especially if you used a really dense wood. Out of interest, is the MF70 big enough to make something like that? I've no idea about these things, but I've only seen Proxxon machines used to make tiny things.
Yes, the Punnet is a lovely idea! If you go on to the raspberry pi forum you'll find lots of different case ideas. Someone took my layered idea and made their own version using card in the shape of a rocket.
@Stephen - Here it is...final picture colored and waxed to come still.
ReplyDeletehttps://plus.google.com/photos/104044018636313646334/albums/5765824495746913377
I selected the lighter (teak) color, so that the burned raspberry logo would be more visible. The birch was too light, I thought, and sensitive for dirt over time. I need to find beech or some other darker material for future box.
I plan to make at least one still with plywood, more square shape, as the "plan" in the pictures shows :)
@Marko - Well, very well done! I got a big buzz seeing the shot of your layers with paper still on - mine looked exactly the same at one point. Also, I commend you on the clearness of your plans. Mine were much more of a mess!
ReplyDeleteIn all honesty, I really like the birch finish. Have you considered keeping it but applying some kind of varnish to avoid the problem with dirt? Also, if you have problems finding the appropriate ply, what about using vaneered MDF? I had wondered initially about using oak-faced MDF.
Look forward to seeing the new version! As I now have a second Pi which I think I'll use as a media centre, I've been considering new case ideas. I'll still go ahead with my original plan, but after that I'll be going back to wood.
Congratulations on your excellent work!
PS - thought you might be interested to see that my case has been featured on Venture Beat http://venturebeat.com/2012/07/16/9-amazing-raspberry-pi-case-mods-including-one-that-looks-like-a-raspberry/
PPS - I've noticed that your first comment got lost in the spam filter - sorry about that!
Thanks, it was nice to do woodwork for a while :)
ReplyDeleteAfter I toned the case with this "teak" color, I must say that perhaps would have been still best to leave it on birch...I as thinking it a lot. I is quite difficult tho get the color equally toned, specially on the sides, top/bottom is not the problem.
I will start the next box. I will consider varnish for that (good and old way), instead of just wax, varnish should also perhaps bring the woods own natural surface little more visible.
Some veneer might be also interesting, and making raspberry logo on top with intaarsia.
I had thought the same - I'd even thought that it might be nice to inlay some copper sheet for the raspberry. So many ideas, so little usable time!
ReplyDeleteYesterday I was also starting to think about combining some "steampunk" style to my next box...I have not seen those style much yeat, not a good one at least.
ReplyDeleteSteam punk - now that would be awesome. I am still awaiting my Raspberry Pi so will have to wait to construct my own box. Another approach for those with less tools is it would be possible to use thinner sheets of veneer a knife and lots of glue.
ReplyDeleteAlso of note is this...
http://www.ebay.co.uk/itm/Raspberry-Pi-Case-Billet-Aluminum-Fits-Model-B-/110941083563
Which though a lovely bit of CNC routed aluminium but it costs more than the board which just is kind of flying in the face of the Raspberry Pi ideology of DIY and cheapness.
I've got my second Pi up and running, so I've got a few more cases to make. I will be doing one with the knife/glue approach, but not with veneer. Question is just how many days it'll take to finish...
DeleteNow the aluminium case - wow. It is a stunning piece of design and milling. The cost is a shame, but you can see where it's going. If I had all the cash in the world, that would definitely be on my shopping list.
What are you intending to use your Pi for, Lee?
One neat bit on the CNCed board is the 3 mounting holes. Though it would be even better if there were 4 holes spaced correctly so that it could be monitor mounted.
ReplyDeleteWould it be possible for you to post a pdf so we can cut out the right sized pieces?
ReplyDelete+1 on the PDF idea
ReplyDeleteReally nice work! a pdf or any kind of template would be greatly appreciated so I could get started while I patiently wait for my backordered pi.
ReplyDeleteI'm sorry it's so late, but a plan is now available here http://singlelensreflections.blogspot.co.uk/2013/05/plypi-plans.html if you're still interested.
DeleteThis comment has been removed by a blog administrator.
ReplyDeleteHi Stephen. I'll start off by saying that I'm going to end up making one of these cases myself no doubt!
ReplyDeleteRE: LEDs.
Since you are in the UK (I am in Finland) pop over to starscape.co.uk and get something like their fibre optic sample pack for what, £8? You can easily drill tiny holes through your plys and CA in some fibres to re-transmit the light to the surface. I do this with guitars as side markers using a common LED in the body routed through under the fingerboard.
If you are feeling particularly sexy, you could rout the fibres up and then between two of the plys through channels so they emerge at the end of the case.
For super sexy, use Sterling silver tubes from bead shops with the same bore as your fibre to make a perfect outline for the fibre.
Am I overthinking this?
Hi Carl,
DeleteGood luck with the case - I'm sure with your skills you'll come up with something special! I've been reading up on your work as a luthier - I'm very impressed. I'd love to have a go making musical instruments (I put together a very basic ukulele kit with my fiancee, but the body was already constructed). Maybe one day!
I love the idea of silver tube. As soon as I read your comment, I went on to cookson gold and found that they do sell 1mm bore tubing. Hoping to make a pair of wedding rings some time soon, so it might be worth buying some tubing at the same time to play with!
Is there somewhere specific I can follow your work?
Oh, and thank you for the link to starscape.co.uk - the question now is how long I can live without a fibre optic star ceiling!
Sorry for not having replied re: PDFs everyone - my health's taken a dip recently and I've been having a bit of trouble keeping above water with every day life stuff.
ReplyDeleteI'm afraid it'll be a while before I have access to the paper plans, but when I do, I'll do my best to make them available.
Until then, good luck to anyone playing with making their own version.
Awesome case, I do like it ^^
ReplyDeleteNice case! Did you allready had a change to upload a template?
ReplyDeleteIt would be appreciated!
You can now download the plan at http://singlelensreflections.blogspot.co.uk/2013/05/plypi-plans.html
DeleteStephen,
ReplyDeleteThis is brilliant and classy, sir. The case alone has made want to buy a Pi ASAP! Quick question - I'm using a Chromebook these days (and a lot more frequently than I ever thought I would) and thus I'm considering parsing down in the desktop arena as well. Has this served you well as a desktop machine?
Many thanks for your response.
-JD
Hi JD,
DeleteAs Mark has said, I'm not sure I'd trust a Pi to have the power you need to replace a desktop. I mean, it depends what you actually use a desktop for, but if you're doing any photo editing, then I feel the Pi is out. I'm not sure I'd go the odroid route - how would you feel about building your own mini-itx rig? There are motherboards with low powered built in processors. It wouldn't cost a great deal (although significantly more than a raspberry pi, of course!) but would allow you to do pretty much anything.
Best wishes
Stephen
JD, You might consider an odroid-U2 if you need a bit more grunt than the raspi can provide.
ReplyDeleteOK everyone - just in case you've not seen, I've published the plans. You can download them here http://singlelensreflections.blogspot.co.uk/2013/05/plypi-plans.html
ReplyDeletethanks for sharing useful information with us
ReplyDeletehttp://woodeniphonecase.wordpress.com/